Wednesday 30 January 2019

Front and Rear Suspension

    Rear Suspension, i ordered a set of nice KZ 750 units, in very good condition, or so eBay man says. And the pictures of them reinforce his statement. So $32.00 including delivery, they were swiftly ordered. Pictured here:


     So I hope they look as good when they arrive. I did consider new parts and even some from china, but I am on a budget and these will keep the look pure and in keeping with the original ethos of the 59 club.

     As for the front forks, here are a few tips:

1.     Loosen the top fork bolt - in my case a 1/2" square recessed bolt, whilst still on the bike, or at the very lease, keep the forks in the yokes.


2.     Use either a impact wrench (air) to loosen the top bolts, or as i did, a breaker bar, I prefer to use a little torque as opposed to impact wrenches on occasion.. My suspension, I suspect has not been opened or serviced since 1979!


3.     I ordered the wrong tool to get the damper out of the fork legs. It was from eBay, my bad. The correct tool is part number 57001-142 - and is quite the elusive little f****r to find. A back up is a tapered dowel, here is hoping that works.

     The front forks, as I mentioned, look like they have never been apart, the oil, what little remained was very thick, smelt terrible and was the darkest green/black i have seen. From both forks, less that 2 fluid ounces drained!  So now, I need to improvise the front 57001-142 tool, or as a last, and hateful resort, take the legs to a shop for them to loosen and remove the hex not in the bottom of the forks for me. I say hateful, only because i want to do as much as i can myself.

     Once done, I can clean and service the forks and reassemble. Put new seals and covers on, but not before I put 20w oil into them. I chose 20w as I am a 225 lbs rider, so i wanted to stiffen the front a little. My only dilemma is whether I should change out the springs for progressive units. Around $100.00 or so.

     The lower fork legs will get a polish prior to reassembly, just to complete the overhaul.

     Update: Think I need the special Kawasaki tool, my last chance is an impact wrench and tapered dowel to hold the internals of the forks. If this fails, a large bag of f***s will be needed. Plan B being to polish the lowers forks on the tubes and then re-assemble. Assembly after replacing the seals, this is possible with the tubes still in place, but a whole lot easier disassembled. I will need that bag again....

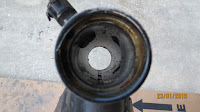
     Update 2: I have put my bag of f***s away. With the appropriate use of an air impact wrench and a shaped wooden dowel I have got my suspension apart. Basically, tap the dowel into the damper, inside the tube and hold it, then - with an 8mm hex attachment for the impact wrench, undo the bottom bolt. Took all of 3 minutes. Job done, all stripped, ready for the service, polish and reassembly:


     The shaped dowel can be seen at the bottom of the picture. The Hex nut at the top right, damper is the short piece in the middle of the pic. I don't think this suspension has been apart or serviced in 30+ years.


Wednesday 23 January 2019

The Frame Part 2

     Well, the frame has had its last cut and welding done! I am a happy man, the frame has lost no rigidity and is now 5 lbs or so lighter and looks a lot better.:


     As you can see i have removed the rear foot rests and from the 3 lower pictures, i have welded closed the frame remodeling. Giving the evolution shown below:


     The whole rear end is now definitely how i want it to look. While doing this i realized that the head bearings were the very old loose ball bearing type, i will be replacing these with the modern tapered bearings, around $35.00 from any store or eBay.  In order to do so i had to remove the old bearing seats. This is easily done with a hammer, long screw-driver and some percussion adjusting. It takes around 5 minutes to remove the old seating:


     So now to order the new bearings, to fit after the powder coating. The powder coating is going to be done by Powder Tech Plus Inc. These guys come highly recommended and are charging around $220.00 for frame, swing arm and side stand. I elected to use HVT wheel pain for the wheels and steering head stuff.     Well, today (29 Jan 19) is a good day. Took the frame to Powder Tech Plus, got a good rate for the work. It will be a week before i see the results, but have elected to go with a gloss black finish, can't wait to get it back. Also ordered new, well new for me rear shocks from eBay. I elected not to get some Chinese air filled parts, or even new progressives. The only upgrade i went for is putting 1978 KZ750 parts on order. Advertised as in VGC, and only $32.00 delivered. Pictured below from the add:

     Look good, i hope the picture doesn't do them justice! Also got fork Oil for the front.     Update: The rear KZ750 units arrived, and are better than expected, I am a pleased and satisfied builder today.


Thursday 10 January 2019

The Wheels

Well, i know, it has been a while. I bet you all thought i gave up! Well i had a couple of family issues to deal with and a lot of work to catch up on, but i am back.

This bike was the first in the line to be supplied with alloy wheels. Not strictly Cafe Racer i know, but in the tradition of restore not replace where i can to achieve the look (not to mention keeping costs sensible). I elected to refurbish the wheels. These are 40 year old alloy wheels.........

And technology was still catching up, so they were supplied with tubed tires. Again, because of my frugal nature, I decided to get the tires off myself. Very old tires and tubes. Additionally, the rear came with, what i now know as Rim Locks, the rear had 2 of them. This meant 3 valve size holes in the rim. The tires were a challenge, after deflating - I could not break the bead - no matter what I tried, until I used a 4 inch C Clamp to squeeze the tire away from the rim, then - using a combination of a 4" angle grinder, hack saw blade and snips i cut the tire from bead to bead. Each tire took about an hour to remove:


As can bee seen, under the tire it was a little 'gunky'. This was cleaned up with some wire wool and mineral spirits. In the last picture you can see one of the 3 'valve stem' holes. This was for the Rim Lock, usually found on trail bikes...?
So i first had to fabricate 2 aluminium plugs for the rear wheel. I do intend to run tubeless tires, however if the plug proves nothing more than cosmetic, i will run the same tire with a tube. It wont remain V rated, but this is a KZ650 not an issue. The holes were the perfect size for SAE 3/8 fine thread, that's 24 tpi. So i tapped the holes and then produced 2 threaded rivets. Tested for fit and then screwed them in place, from the inside, with a liberal amount of Gorilla Weld. Cut the excess from the outside of the wheel, filed and finished each one. The aim being an invisible fix once i have painted the wheels.

Now to the raw alloy on the spokes and rim. I cleaned and then started wet / dry paper sanding down in grits - 220 / 500 / 600 / 1000 / 1200, finishing with a wire wool wash with mineral spirits to prep the wheel for paining. To get a wheel stripped, washed, sanded and prepped for paint took around 5 hours, so that's 10 around hours in all. Below is the before and after pics, with a side by side picture of the rear wheel prepared and the front not started. The pictures do not do enough justice, but once painted they will gleam.


     Update: The wheels are done, brake disks cleaned, just some husbandry to complete on teh bolts and drive to assemble. Came out not to shabby as it goes. Not bad for a lot of elbow grease and 2 rattle cans of paint and lacquer.