Tuesday, 9 July 2019

The Carbs.......and i don't mean potatoes!

     The day has come, it's carb time.
In need of a good service........and a clean


     I took a deep breath, exhaled and repeated, carbs are a black art. That's what I thought, thta's what I feared. "Oh well - in for a penny, in for a pound". I prepped my work area and got the tools for the job, various flat head and cress head screw drivers, carb clean, WD-40 and a plethora of shop wipes.
    I tentatively took the carb top covers of, then sighed, realizing I needed a carb kit and gaskets....off to eBay I trotted. The card servicing kit, and the subsequent correct lower gaskets rushed me a michty $45.00:
 

     The float bowl gasket for my KZ650C are slightly different to the ones supplied in the kit, can you see the difference above? Anyways, the prompt arrival of my parts facilitated my carburetor adventure.
     Back to the work bench I went, and started. Now I am usually methodical to start and then as the confidence grows, neat and tidy goes. This was not going to happen this time. After reading much about jets and exhausts, being none the wiser it was decided to go with 102.5 main jets as the bike is going to get a nice 4 into 1 set of pipes.
     Tops off and bits out (fnar fnar, hehehe). These have not seen the light of day since they were built, or so I suspect. The insides were covered in a powdery residue and stains. The logical approach to cleaning and servicing began:

The carbs were testing me, but I was triumphant. I managed to get them off the mounts, separated and apart. Initially laying them out in order on the bench, so as to assemble beck in the same order. Clever eh? The the cleaning, mainly with alternating WD-40 and carb cleaner. I decided to give the card covers a bit of a polish, but not to much. Not wanting a mirror finish on them. Wanted them more 'enginey'. As you can see from pictures, they buffed up and cleaned out none to shabbily.  The throttle bodies and needles
were carefully disassembled and cleaned, needled and washers replaced and put back together. The float assembly was given the same treatment, as were the floats and float bowl. The jets were removed, being replaced with the afore mentioned 102.5 pieces.
     The exterior of each carb was gently cleaned, again, no painting or rough treatment. Then the piece was assembled and put to one side.
Dry and dusty
     Rinse, repeat four times. The carbs them selves are now clean. The next challenge was the choke, mount and fitting my newly acquired pod style air filters. Another eBay acquisition, and, as with all eBay transactions, 3 weeks later a set of K&N pods sold for the same price as my 'replicas'.
     First of, all connecting tubes and bodies were thoroughly cleaned, my attentions now going to the aluminium mounting bracket. I did think on polishing the whole thing. Decided that i did not have the time of patience for than, so it was cleaned and sprayed the same gunmetal shade as other parts of the KZ. High temperature paint being the weapon of choice. Then final assembly began, so far so good and all very methodical. When i got to the installation of the choke, it was decided that the mounts and choke pieces were to be cleaned and parkerized. Good job i used to do this a lot for my guns.Do a quick go on the wire brushes and into the 'goop' for ten minutes. Whils the pieced were cooking I cleaned and painted the choke lever. All looking fine now.
     The putting together of the puzzle was easier than i expected and results pant wettingly satisfying. The pictures do the work som justice, but, mmmmm.


     My, what great pods. Well actually if they perform as good as they look, my KZ caferacer will sound and perform most satisfyingly. Here are a few more pictures, just to complete the story:
 You can see the colour used for the bracket in this picture. 2 primer coats and 3 wheel paint coats. The overall outcome was very nice indeed. All screws were lightly polished and the same for the bolts. Again, I stress that i do not want to over restore the bike at this stage, just get it to a very nice and rid-able condition, and then iron out it's foibles and change what I need to, so the bike lives and evolves.


     That was that, they took a week or so in all, what with work and the long haired colonel needing my attention too. I am satisfied with the results, I just hope that not too much tweeking will be needed. I may employ the help of an engine guru, now to find one here in Jacksonville. And now the last big piece for the build. The 650 lump..........


Monday, 10 June 2019

Some good bits from the father-in-law

    Here I am, visiting the UK, a sabaticle if you will. Barry, my father-in-law,  a body work guru and former race team owner, all round nice guy gave me some bike bits. He is an RGV specialist and back in the day - when caferacers were not retro, quite the racer and he hung in all the right circles with some world class riders.
    Any how, he gave me some aluminium foot pegs, brake peddle and gear lever. Saving me time and getting more of those pieces on the bike. The lever will get painted black, over the blue anodizing.


     Oh, and a couple of in line fuel filters too. All most welcome and will make it to my build.  There will be a little fabrication and bespome building to fit them. Happy days, thank you Barry.

Monday, 29 April 2019

A trimmed and polished front fender.

     This one bit me, more on that later. The 70's chrome fender is definitely period, and not entirely in the cafe-racer style it had to be fixed. Again, in the spirit of my build, modification of the existing part is more desirable than a purchase of a fiber-glass replacement. The fender was showing age related spotting on the chrome to just outright rust.


     First, as can be seen, i measured the fender, electing for something trimmed at both ends and half its current length. The initial cut lines can be seen on the picture above. Cutting something that you cannot undo is quite daunting at first, so i started with a straight trim along the lines and then slowly cut into the line i traced from the original front piece. The rear of the fencer has a den in it, so had to do anyways.

     With my trusty 4.5" grinder, i cut away and shaped. For smoothing out the curves, finding a pivot point for the fender and keeping the grinding wheel stationary and pivoting the fender produced so very satisfying results. You can see from the pictures. I have found that my 4.5" grinder has been invaluable. So, after shaping i ground out the rust, using the wire wheel attachment. It bit me. I t was my fault, trying to hold both the grinder and fender. The grinder skipped and dragged itself across my stomach, producing a rather nice road rash and and ouchy. Something you only do once! Lesson learnt. After checking I had not been disemboweled, the underside of the fender edges were filled with metal filler, removing the sharp edges and masked off for painting. 2 coats of primer and 2 of the gun metal wheel paint. The fender looks good:


     The tape removed and a final polish was done. I may try some type of chrome restoration on the fender, but for now, job done:


     Front end is now almost complete. Pictures and a video will follow.


Wednesday, 24 April 2019

The Headlight.........

     OK,  I hear you, where has he been? Why no updates for a while. The simple answer work and more work making demands, can't wait to retire. Anyhow, back to the blog and my bike. Every day I do a little bit, if I can, the familiar words to the missus "Babe, just popping in the garage for 10 minutes...". Oh, how she knows me, her reply "See you in 3 hours then!".
     The main focus of my attention this week has been the 'Bubba'd' head light. Yes - I could have purchased a new on, but that goes against what I am trying to achieve here. After a little searching in my garage, and the thought "I know it's here somewhere.", I found the remains of a fiberglass kit, with just enough of everything I need to refurb the head light. The surrounds have been powder coated by the very talented people at Powdertechplus of Orange Park, and the cover is going to be my task.


     As you can see, the hole in the back looks like it was cut with a 1930's tin opener. I set about sanding and then fiberglass over the hole and getting an enclosed cover to start with. Sanding with 220 grit and then 500 grit paper, to get it smooth and a good key for the fiberglass. I then formed the inside of the cover.


     Having let the inside cure, I then formed the outer surface. As it turns out, it hasn't come out too badly, especially with my skill levels as a body work guru are average. The next stage came out thus:
  

     And then to the out side, more sanding and priming. I did get a blister on my thumb (Dire Straights), sanding. More gloves needed. As I have found, most skills are learn-able, even if only at a basic level, but, I think, in this case it has been worthwhile, if only costing me time. It has saved the cost of a new headlight.
     I then primed and sanded and primed the light housing to achieve a finish i was happy with, or as near as i could get to it. Perfection is a question of time, skill level and patience. I have some of these and perseverance. Once primed i elected to put my first coat of Gloss Black paint on, then, more after I realized than by design, cut the hole for the wiring in the cover. This i completed with a 2 inch hole drill, the kind that is a circular saw with a drill bit in it. Thus completing the initial fit. The hole was cut in pretty much the same place as the original 'Bubba Cut', and is so much cleaner and pleasing to the eye.
     You can see how the hole cutter worked from the picture to the right. There was a little fraying of the glass inside the cover, but that sanded out with no issues.  The rattle can finish is not as good as a professional job, but is so much improved over what was on the bike, and I have again salvaged a case for the dumpster into a very usable piece. It does, at this stage need a light 2000 grit wet and dry followed up with a gloss lacquer to finally finish it. That will be tomorrows job, once the paint has cured.
     Paint cured, sanded and touched up. Lacquer applied, sanded and repeat. The cover is done. As a rattle can product, i am quite pleased with the overall result. Yes, it could be improved, but I am using my time as well as I can, learning and applying new skills as a task presents itself. Once my bike has been completed to it's initial stat, it becomes the embryonic state and will evolve. So cover completed, have looked for, and ordered the indicators, eBay specials. Will publish more on the completed front end soon For now, here is the finished cover picture, will assemble the headlight once indicators have arrived.


Tuesday, 19 March 2019

Rolling Chassis - Pt 1

     Oh my, I thought, today is the day I start to put my Caferacer together. Armed with a little trepidation and a lot of enthusiasm, it began.
     First, all the initial parts were collated and inspected ready for assembly. Forks, yokes, handle bars, swing arm, side stand, front brakes, rear brakes and torque arm.  All parts cleaned, restored, repaired or replaced as needed. The assembly was straight forward, I wish i have done a time lapse of it. All in all I took about 2 hours greasing and assembling the KZ650C, transforming it for a compendium pf parts to my rolling chassis:


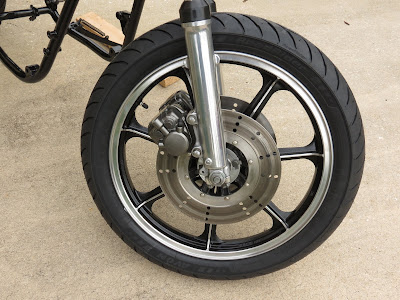
     As you can see, looking promising, the wood was just to protect the bottom of the side stand, and below a close up of the wheels and brakes. Alarmingly, I did not restore the rear calipers when I did the fronts, so I took a few hours to do those as well. The result is rather pleasing, oh, and i have put the dust cover on the rear calipers now too:

 I do like the black, polished aluminium and gunmetal combination on the wheels. I can't wait to get the rest of the build flowing and interval pictures.

     The next few days will be spent bolting on other items such as the clocks, grips etc. Have to wait for the money tree to blossom again before purchasing the brake lines. I do have the old ones, however, the bike will benefit from braided hoses all around, not to mention it will look better too.
     The to do list is then dominated by that unloved lump, 650cc of Kawasaki screaming 70's engine, not sure how far the strip is going to go. I am replacing a lot of gaskets, plugs and cleaning / polishing various engine casings. Painting a few in black too. Here is the video of the chassis, with my dulcet tones as a backing track, maybe i should learn a little video editing, and put a proper soundtrack to it.


I did like my dalliance with a video effect. I could get good at this...or tiresome, lol. Until later. TTFN

Friday, 15 March 2019

The Tires (Tyres) are on the rims!

     Oh happy days and a big thank you to Cycle Gear of Orange Park, a very knowledgeable and friendly bunch. I initially went in for some fork oil, ah the forks. Just the forks, lol, a trial and triumph of mine, they look really good on the frame (see previous entries and, indeed, the next.). Got speaking to them, and they order and fit tires, if ordered through them - same prices online as google anywhere - they fit them for just $25.00 a rim.
     Now, my old Zed rims are not tubeless, so needed tubes as well. Remember i filled and hid the tire lock holes on the rear. I don't think they are needed for a road bike, trail - yes, road - no. So filled and finished the wheel was. And both looked good.
Now - the tires (tyres). I like Avon tires (tyres) for older bikes, don't ask why? Because i don't know, i just have an affinity for them. Any how, cycle gear very very helpful: tubes, tires (tyres), rim tape and fitting with lead if required was a comfortable $310.00, looking around, i feel local is best and reasonable too. The tires (tyres) I plumed for are the AM26 Roadriders.
     After one call, to inform me the tires (tyres) were in, the next day i got another "Mr Paul, can you confirm what way the front wheel goes on the bike, please?". After some thought (yes i got a headache) I told them the side with fitment for the speedometer drive was the left hand side of th bike, it is the bit that rattles a little.....
     Two hours later i collected the wheels, went to work. Got home later that night and looked at the wheels - "F*** me" - I thought, and possibly said - "The front is obviously on the wrong way around!" - the tread pattern was 180 degrees out from the rear!


     Now before i decried the guys that fitted the tire (tyre), of to the tinterwebs for a look and research. Of note, the rear says for rear use only, the front has the word 'UNIVERSAL' on the sticker. "Hmmmmm" I thought, "odd, best the research is a little more thorough". It turns out, and it took some getting my head around, that the tire (tyre) is turned 180 degrees if it is a universal fitment. Looking at the sidewall of the tire (tyre) reinforces this:


     The direction of rotation is opposite for the front and rear fitments! In brief - it is all about the forces applied to the tire (tyre). When on the back the forces are from the engine - acceleration. When on the front - the forces are from braking. All tires (tyres) are built to take forces one way, hence the flipping when on the rear or on the front!
     How I sighed a sigh of relief. So glad I didn't call and rant at Cycle Gear, who have done their job perfectly. I was almost the fud! Now the wheels are good and sexy and ready for final fitting. That is this weekends job. Until then, here are my wheels in all their completed glory:


     From a happy man, TTFN.

Thursday, 7 March 2019

The side stand

     So, with everything parkerized and powder coated, a quick and easy fit I thought, the side stand......How wrong i was.
    The spring is a veritable bastard, after cleaning the rust and parking, of to my shiny frame i go. The stand fitted nicely, bolt looking fine against the glossy black frame. The I tried to stretch the spring, hmmmmm, its a strong one, and i did not want to use any leverage against my frame. I simply could not stretch it. What to do, of to you tube me thinks, get a hot tip, a bit like the distilled white vinegar procedure I used for the chain.
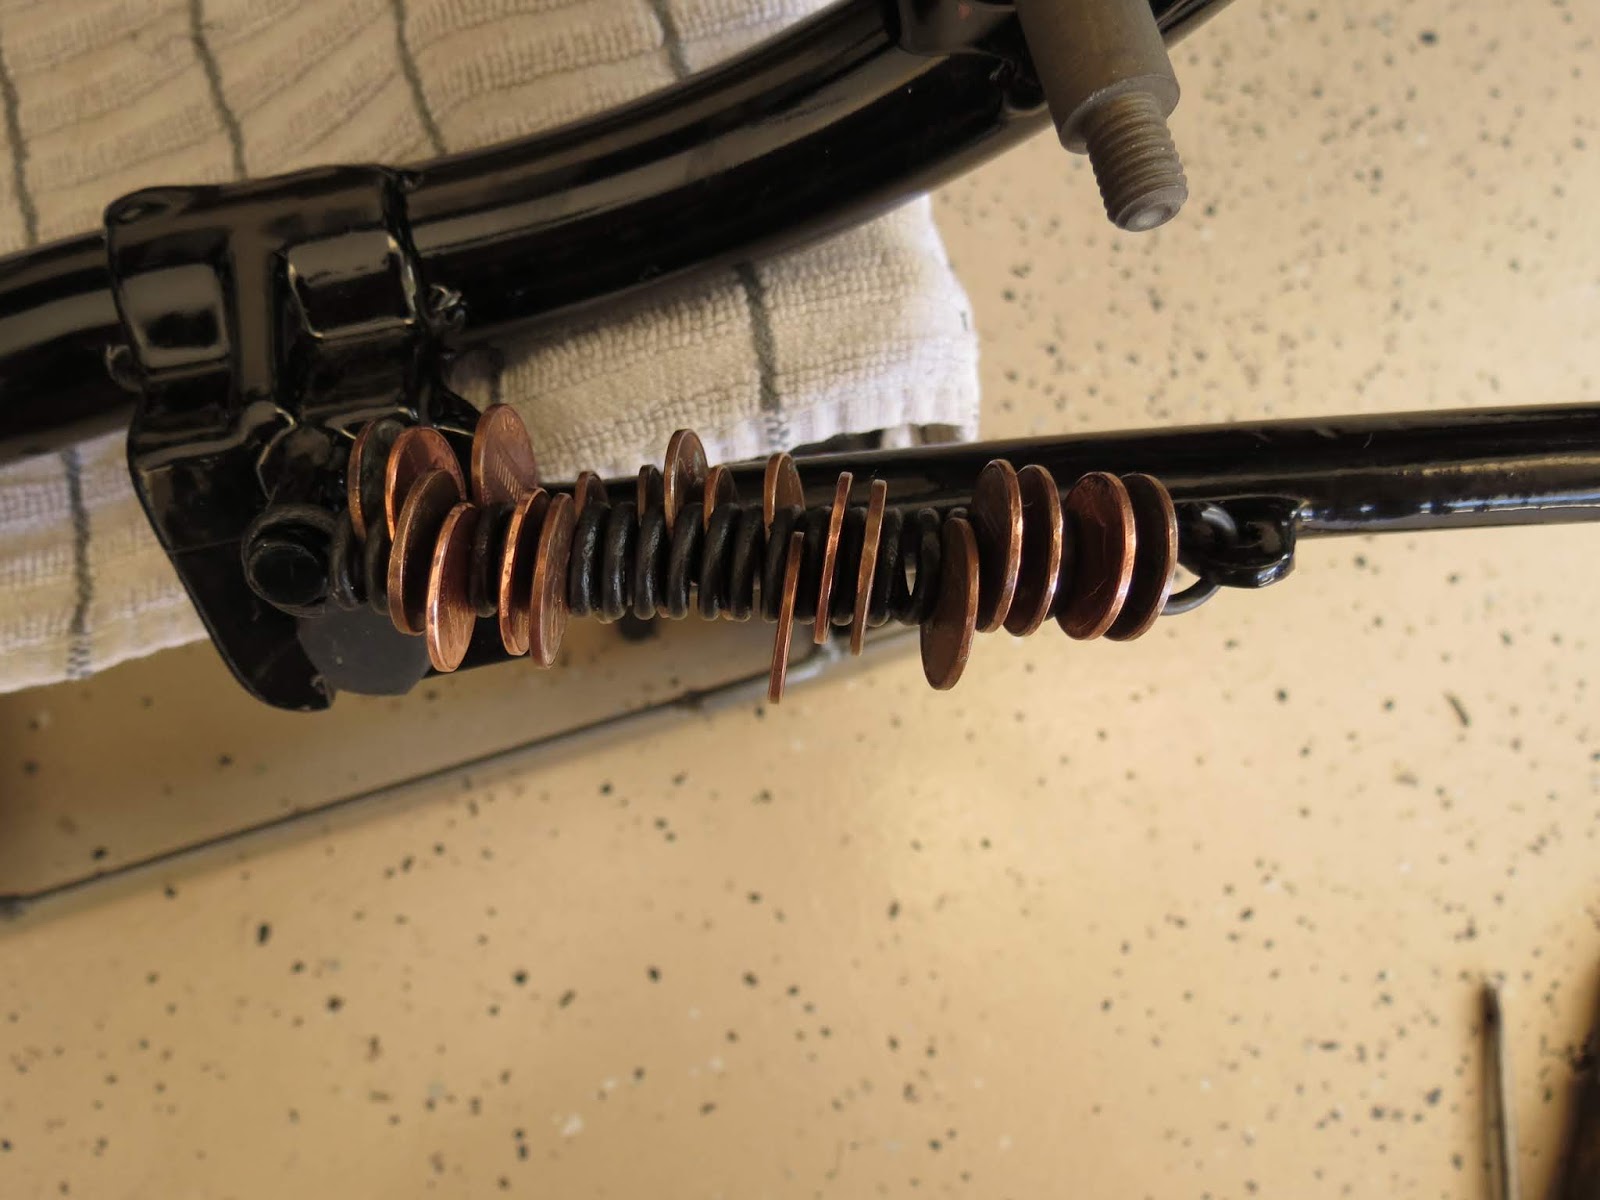
     Apparently, there is lots of advice, the best, that avoids levers and pry-bars involves 20 pennies and a little patience.

  As you can see, the spring is short, and very strong, maintaining fidelity to place the spring over the required lugs / retaining holes. The spring is about 2 inches short. The thing to do is get the pennies and insert them in every twist of the spring, thus lengthening it by the required amount:


     This stretches the spring enough to comfortably fit it without sweating, grunting or scratching my very nice powder-coated frame, ensure the stand is in the up position:


     Ahhhh, I hear your cry, how do you get them out without doing the very damage you are trying to avoid. 'Simple', is my retort - simply put the stand from its' raised position (the shorter of the stretched spring options) to down, this extends the spring and the pennies fall out.  I know, it's genius, simple and gentle to the paintwork.

     So,that is it for today, a problem solved, things learnt, saved by You-tube and some lateral thinking. Next up, the tires (tyres) and a complete rolling chassis, ready for the brakes. The engine is getting disassembled over the month too. Only part causing trepidation is the strip and rebuild of the carbs. More to follow, TTFN.